- 2025-03-20
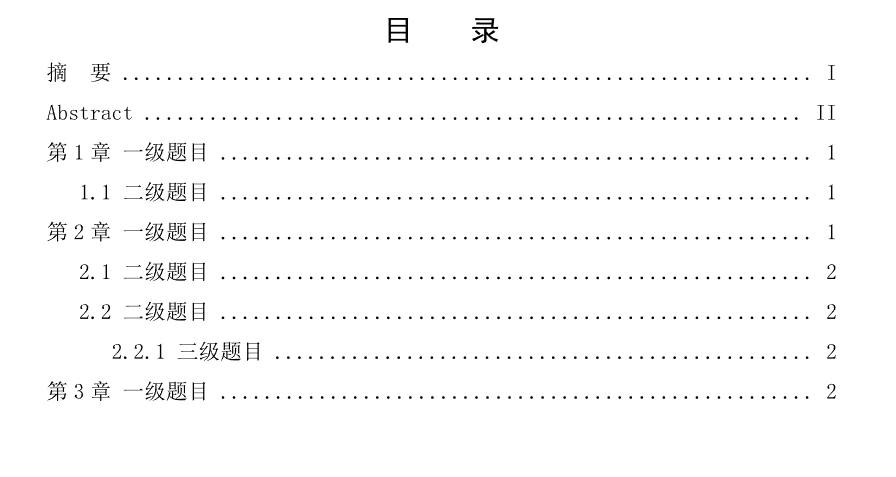
- 更新「目录不同层级标题使用不同样式」到 Typst 0.13 版本
- 在「结合 showybox 与 ctheorems 包制作美观定理环境」添加了提示
- 2025-02-28
- 更新「在 Typst 中绘制 LaTeX 符号」
- 2024-10-20
- 更新文章中部分链接
- 2024-10-08
- 更新「在文本中使用美观的大括号分类」
- 2024-10-02
- 更新「结合 showybox 与 ctheorems 包制作美观定理环境」
- 2024-10-01
- 更新「目录不同层级标题使用不同样式」
- 2024-09-27
- 发布文章。
warning本文主要编写于 Typst 0.12.0 版本,部分内容未考虑新版本更新内容,可能已经过时。
如未特别注明,本文中的代码均基于 Typst 0.12.0 版本。
怎么找解决方案#
多翻翻别人趟过的坑:
-
翻文档
- Typst 中文文档(注:该文档长期未更新,已过时。建议参考官方英文文档。)
- Typst Documentation
-
翻示例
排版经验#
不同层级标题使用不同序号格式#
其实是如何为每一级标题指定不同的编号格式? - 常见问题 | Typst 中文社区导航的重复造轮子,但是造轮子的时候没看到这个东西,造都造了就发出来算了。(用 Typst 群群友的说法,在 numbly 包出来之前,人人都有自己的 numbly 轮子(笑))
#let diff_numbering(..schemes) = {
  (..nums) => {
    let nums_arr = nums.pos()
    let schemes_arr = schemes.pos()
    if nums_arr.len() >= schemes_arr.len() {
      numbering(schemes_arr.at(-1), ..nums)
    } else {
      numbering(schemes_arr.at(nums_arr.len() - 1), ..nums)
    }
  }
}
// 使用
#set heading(numbering: diff_numbering("第一章", "1.1", "1-1-1"))
= 一个章节
== 一个小节
=== 一个小节的小节
= 第二个章节
== 第二个章节的小节
=== 第二个章节的小节的小节效果:

使用 numbly 包可以达到更好的效果:
#import "@preview/numbly:0.1.0": numbly
#set heading(numbering: numbly("一|{1:一}章", "a{1:1}.{2:1}", "1?{1:1}-{2:1}.{3:1}"))
= #lorem(1)
== #lorem(2)
=== #lorem(3)
== #lorem(2)
=== #lorem(3)
=== #lorem(3)
= #lorem(1)
== #lorem(2)
=== #lorem(3)效果:

填空栏#
#let grid_blanks(cell: grid.cell, blank-width: 2em, line-width: 0.05em, colon: [: ], ..args) = grid(
  ..args.named(),
  ..args.pos().map(label => (cell([#label#colon#box(width: blank-width, stroke: (bottom: line-width))])))
)

// 使用
#grid_blanks(
  columns: (auto, auto),
  align: right,
  row-gutter: 1.5em,
  column-gutter: 1em,
  blank-width: 3cm,
  "姓名",
  "班级",
  "学号",
  "学校",
)

#grid_blanks(
  columns: (auto, auto),
  align: right,
  row-gutter: 1.5em,
  column-gutter: 1em,
  blank-width: 3cm,
  colon: [ $==>  integral_0^1 pi - 1$ ],
  "Name",
  "Class",
  "Id",
  "Grade",
)效果:


页眉使用当前页面标题#
使用 hydra 包。需要其他设置可以参考 hydra 包的文档
#import "@preview/hydra:0.5.1": hydra

#set page(
  header: context align(
    {
      if calc.odd(here().page()) {
        right
      } else {
        left
      }
    },
    emph(hydra(1, skip-starting: false)),
  ),
)效果:

note效果演示使用的是我的多复变函数论笔记的 Typst 版本。
目录不同层级标题使用不同样式#
简易版#
#show outline.entry: it => {
  if it.level == 1 {
    strong(it)
  } else if it.level >= 3 {
    emph(it)
  } else {
    it
  }
}效果如下:
 可以发现,页码也变得歪七倒八的。如果不介意,那么用这个简易版即可;反之,可以看下面的复杂版
复杂版#
warningTypst 0.13 大幅修改了
outline.entry的接口,以下只适用于 Typst 0.12
#show outline.entry: it => {
  let loc = it.element.location()
  link(
    loc,
    if it.level == 1 {
      strong(it.body)
    } else if it.level >= 3 {
      emph(it.body)
    } else {
      it.body
    },
  )
  sym.space
  box(width: 1fr, it.fill)
  sym.space
  link(loc, it.page)
}复杂版是直接照着 Typst 的 outline 函数源码来写的,只有标题的文字部分会修改样式,效果如下:

#show outline.entry: it => {
  // 获取 entry 原本的内容
  let prefix = outline.entry.prefix(it)
  let body = outline.entry.body(it)
  let page-number = outline.entry.page(it)

  // 修改 body
  body = if it.level == 1 {
    strong(body)
  } else if it.level >= 3 {
    emph(body)
  } else {
    body
  }

  // 重新组装 inner
  // 保持和 `outline.entry.inner(it)` 获取的结构一致
  let inner = {
    body
    sym.space
    box(width: 1fr, it.fill)
    sym.space
    page-number
  }
  let indented = outline.entry.indented(it, prefix, inner)
  link(it.element.location(), indented)
}结合 showybox 与 ctheorems 包制作美观定理环境#
tip目前有开箱即用的包 theorion,推荐使用这个。
本节内容参考了 showybox and ctheorems? · Issue #15 · sahasatvik/typst-theorems 的内容并进行了部分修改。
// --------- 定义函数 ---------
#import "@preview/ctheorems:1.1.2": *
#import "@preview/showybox:2.0.1": showybox

#let showy-thm(
  identifier,
  head,
  color: blue,
  ..showy-args,
  supplement: auto,
  base: "heading",
  base_level: none,
) = {
  let showy-fmt(name, number, body, ..args) = {
    showybox(
      title: {
        head
        number
        if name != none {
          [(#name)]
        }
      },
      frame: (
        border-color: color,
        title-color: color.lighten(30%),
        body-color: color.lighten(95%),
        footer-color: color.lighten(80%),
        radius: (top-left: 7pt, bottom-right: 7pt, rest: 2pt),
      ),
      ..args.named(),
      body,
    )
  }
  if supplement == auto {
    supplement = head
  }
  thmenv(
    identifier,
    "heading",
    none,
    (name, number, body) => showy-fmt(name, number, body, ..showy-args),
  ).with(supplement: supplement)
}

#let theorem = showy-thm(
  "theorem",
  "定理",
  title-style: (
    weight: "bold",
    boxed-style: (
      anchor: (x: left, y: horizon),
      offset: (x: 0pt, t: 0pt),
      radius: (top-left: 7pt, bottom-right: 7pt, rest: 2pt),
    ),
  ),
).with(numbering: "1.1")
#let lemma = showy-thm("lemma", "引理", color: green.darken(25%)).with(numbering: "1.1")
#let proof = thmproof("proof", "证明", inset: (x: 0em, top: 0em))
// --------- 定义函数 ---------

// --------- 使用演示 ---------
#show: thmrules
#theorem[
  对任何子集 $Omega subset CC^n$,$cal(O)(Omega)$ 在逐点加法和数乘意义下封闭。
  任一关于 $z_1, dots.c, z_n$ 的复系数多项式在 $CC^n$ 上是全纯的,从而在 $cal(O)(Omega)$ 里。
  若 $f, g in cal(O)(Omega)$,且 $g(z) eq.not 0, forall z in Omega$,则 $f slash g in cal(O)(Omega)$。
]
#theorem("F. Hartogs, 1906", numbering: none)[
  设 $D subset CC^n$ 为一区域,$f: D -> CC$。若 $f$ 分别关于每一单复变量 $z_j (1 <= j <= n)$
  全纯,则 $f in cal(O)(D)$。
]
#lemma("Osgood", numbering: none)[
  设 $D subset CC$ 为一区域,$f: D -> CC$。若 $f in C(D)$,且 $f$
  分别关于每一单复变量 $z_j (1 <= j <= n)$ 全纯,则 $f in cal(O)(D)$。
]
// --------- 使用演示 ---------效果:

在文本中使用美观的大括号分类#
#let my-cases = (..items) => box(
  baseline: 50% - 0.5em,
  width: 1fr,
  math.cases(
    ..items.pos().map(item => math.display(block(item))),
  ),
)

*TEST*: #my-cases(
  lorem(20),
  lorem(20),
  lorem(20),
)效果:

在 Typst 中绘制 LaTeX 符号#
Typst Universe 上有一个现成的包 metalogo,提供了各种 TeX 徽标的绘制函数

其他#
- 对齐
enum/list环境中的文本与标号:List and enum markers are not aligned with the baseline of the item’s contents · Issue #1204 · typst/typst
转换为 Markdown#
我使用 Pandoc 将 Typst 转换为 Markdown 文件,方便放在博客。
tip如果你愿意折腾,可以尝试使用 hexo-renderer-typst 直接在 Hexo 上渲染 Typst 文档。
由于 Typst 0.13 版本已有实验性的 HTML 导出,也可以尝试通过 Typst.ts 进行 HTML 导出。
基础操作#
下载 Pandoc 的最新版本,配置相应环境变量(如果有需要的话),然后就可以开始了。
pandoc --from=typst --to=markdown --output=path/to/your/blog/source/_draft/post_name.md --wrap=preserve "path/to/your/typst_file.typ"不能转换的情形#
warning以下内容基于 pandoc 3.4 说明
import和includepandoc 会报错:<stderr>: hPutChar: invalid argument,因此本地包、本地文件和远程包都不能使用。contextpandoc 会报错:<stderr>: hPutChar: invalid argument
可能有更多转换失败的情形,欢迎在本文评论区留言告诉我。
转换可能出现的错误#
- 与标签相关的内容,转换可能出错
- 数学公式中未使用括号限制范围的嵌套上下标,转换可能出错,如
a_b^c_d(
可能有更多转换错误的情形,欢迎在本文评论区留言告诉我。
实用工具#
- 在线 Typst 公式识别:Typress


